
Management of all operations related to employees inside a company is a crucial factor that has the ability to decide the company’s effectiveness. In the Odoo ERP system, you can find dedicated modules that help you to effectively manage and monitor important operations related to Human Resource Management such as recruiting employees, creating contracts, tracking their attendance, and payroll, managing time off, and maintaining records of skills, and many more. In a systematic manner, the HR department of the company can supervise all these activities effortlessly with the help of Odoo.
Each year, Odoo introduces some advanced features and changes in the functioning of modules that will benefit the user in simplifying business processes. In the latest version of Odoo also, you can find amazing changes in the appearances and functions. The HR Management system in Odoo offers you advanced features in each module that help to increase the working efficiency of the HR department.
This blog will detail the new features introduced in the Odoo 15 HR Management modules.
The new features in the Odoo HR-related modules ensure to provide a user-friendly platform for all types of users. By utilizing the new changes in the modules, you will be able to manage your employees and operations concerning employee management seamlessly. Apart from the appearance changes, you will get some new dedicated menus inside the HR modules that reduce the difficulties in the smooth functioning of the modules.
Recruitment
In the Odoo 15 Recruitment module, you can find new updates in its functionalities that will help a user to simplify the Recruitment process. While managing the Job Positions in this module, you will get an additional field in Odoo 15 to mark if the application is published on your company website.

As you can see in the screenshot above, the ‘Is Published’ field can be used to specify whether the Job Application is published on the website of your company or not. If it is not published on your website, you can use the ‘Go To Website’ button to publish it on your website.
The list views of the various platforms in the Odoo 15 Recruitment module has improved a lot. It is possible to add additional fields to the List view to enhance the preview of the data. You can use the Add Custom Field option to create new fields for the corresponding list views.

This can be done easily with the help of the Odoo Studio. As per your requirements, you can add additional fields to the list view.
We are already familiar with assigning various stages for the recruitment processes in the earlier versions of Odoo. What you can find in the latest version of Odoo is, you can set any stage as the hired stage.

In the configuration window of Stages, you can set a particular stage as the hired stage. This indicates that the applicants who come under this stage will be considered as hired. You can move all hired applicants to this stage to complete the recruitment operations. So, this feature will be helpful to the user to identify all hired applicants.
Employee
In order to ensure improved employee management within a company, you will get a set of new features in the Employee module in Odoo 15. In the latest version of Odoo, you can easily configure the locations of your company and work. If your company owns multiple work locations, you can configure all of them into your database with the help of the new Work Location menu in the Employees module.

The user will get access to the Work Location platform from the Configuration menu of the module. As you can see in the screenshot above, the list view of the platform includes details regarding the name of Work Location, Work Address, and Company. When you click on the Create button, Odoo will lead you to a new window where you can configure the details about the new work location.
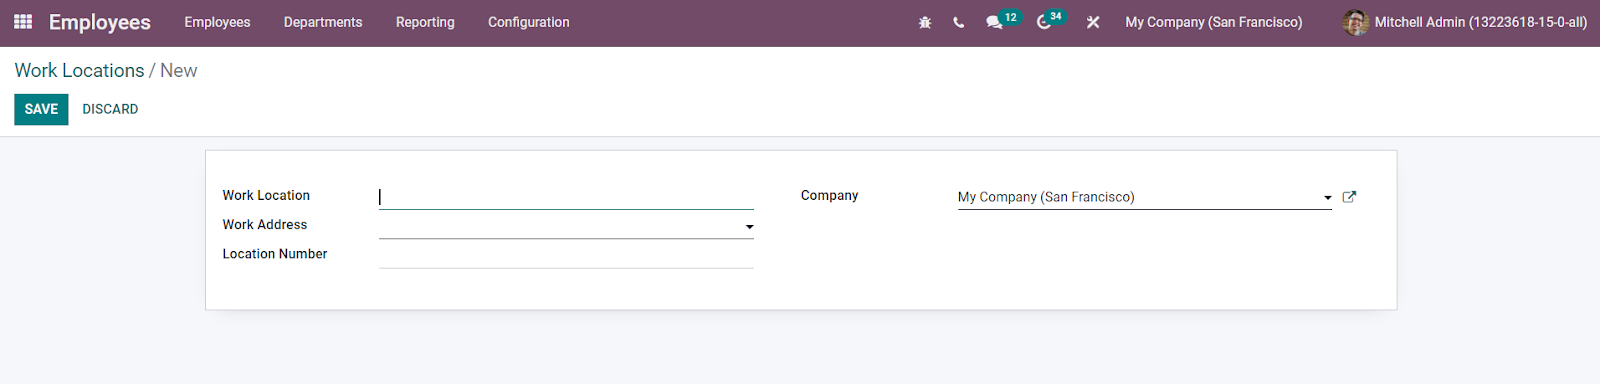
In the new Work Location configuration window, you can specify the name of Work Location, Work Address, Location Number, and Company. Using the Save button, you can save the new location and configure the location to an employee profile while managing employees.
Another advanced feature available in Odoo 15 is a new platform to define Departure Reasons. This platform will be helpful to configure reasons for the departure of an employee. The corresponding platform for the creation and management of the Departure Reasons can be found under the Configuration menu in the Employee module.
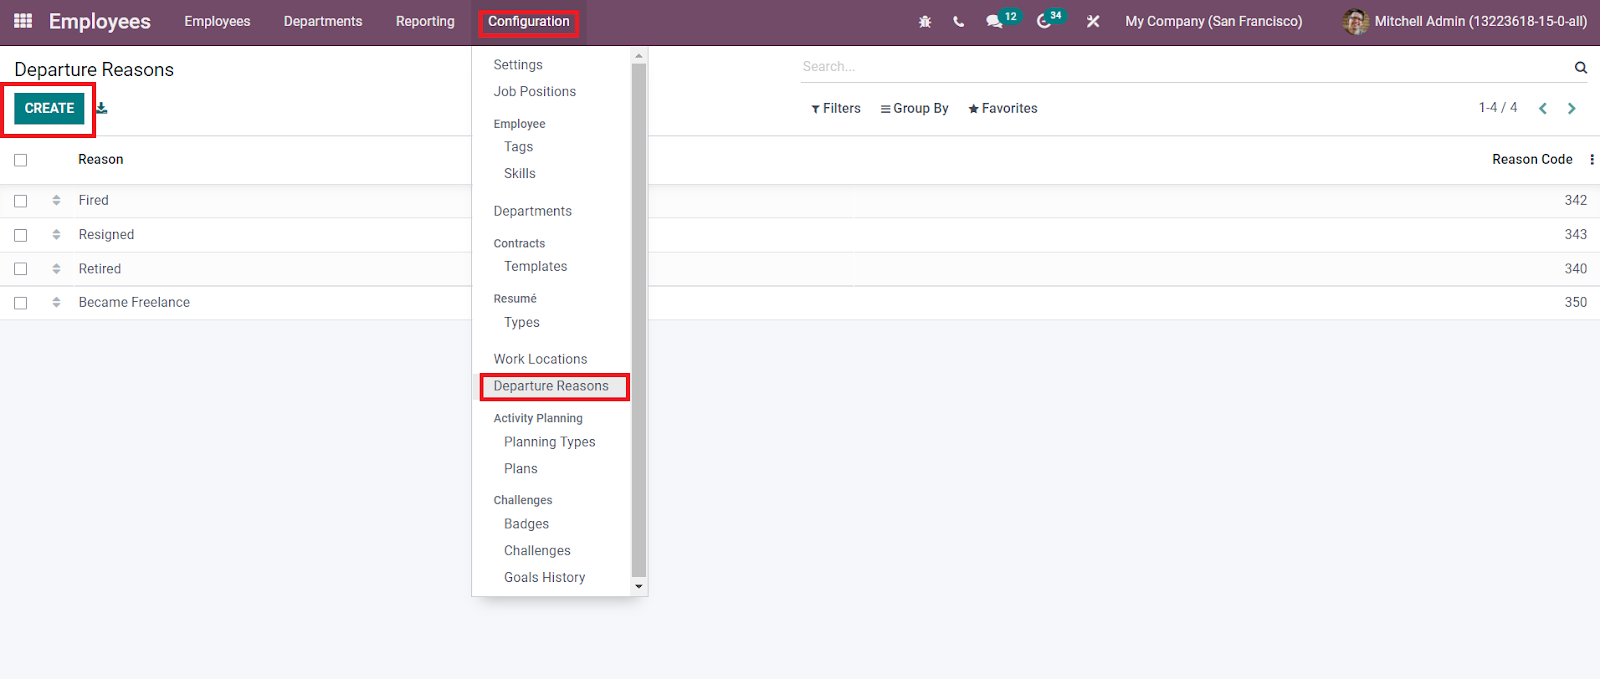
The window will show all predefined departure reasons as shown in the image above where you can configure new reasons using the Create button.
In the Settings menu of the Employee module, the Extra Time off Allocation option can be activated to create allocation requests automatically.

By enabling the Extra Time Off Allocation on Contract Signature, it is possible to generate allocation requests automatically if the employee requested extra time off in the corresponding salary configuration. The default Time Off Type can be also configured under this option.
Just like we observed in the Recruitment module, in the Employee module also you will get the ‘Is Published’ button in the job Position window to mark if the job application is published on your website.

In order to schedule new activities with the employees configured in the Odoo 15 Employee module, you will get the icon for schedule new activity at the bottom of each employee profile.

The small clock icon will help you to schedule new activities with the corresponding employee. This new feature will simplify the scheduling programs. With the help of this feature, the officers can easily assign new activities to different employees from the employee’s dashboard itself.
In the Odoo 15 Employees module, you will get access to new submenus called Advantages, Personal Info, and Resume under the Salary Package Configurator in the Configuration menu of the module. The Advantages platform will show already configured advantages along with the details of the Name, Advantage Field, and Salary Structure Type. You can create a new one using the Create button.

Odoo will direct you to a new window where you can create new Advantages for your employees.

Specify the Name of the Advantage, Advantage Field, Cost Field, Advantage Type, Salary Structure Type, Icon, Impacts Net Salary, Advantage Unit of Measure, Activity Type, Description, Display Type, Requested Documents, and Template to Sign in the corresponding fields.
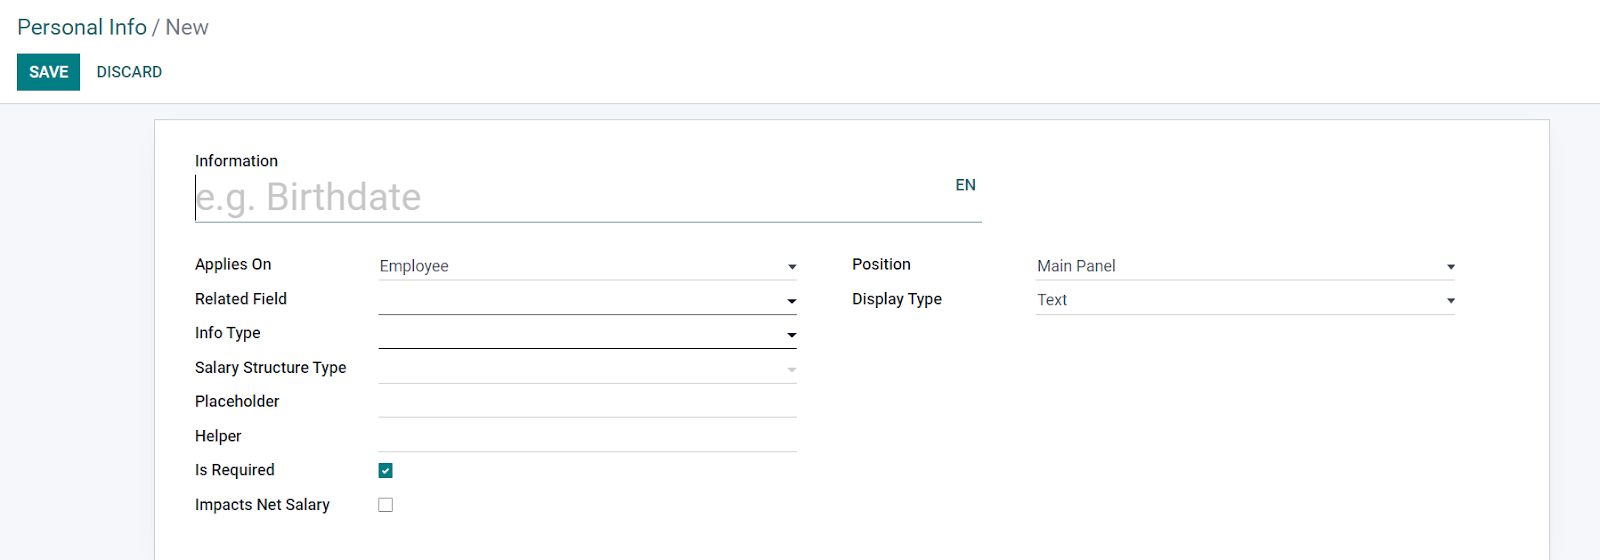
The Personal Info window can be used to create new information fields that you want to include in an employee profile.

While creating a new Personal Infor, you can specify the title of the Information, Applies On, Related Field, Info Type, Salary Structure Type, Placeholder, Helper, Position, and Display Type.
Similarly, you can manage the Resume also using the Salary Package Configurator menu.
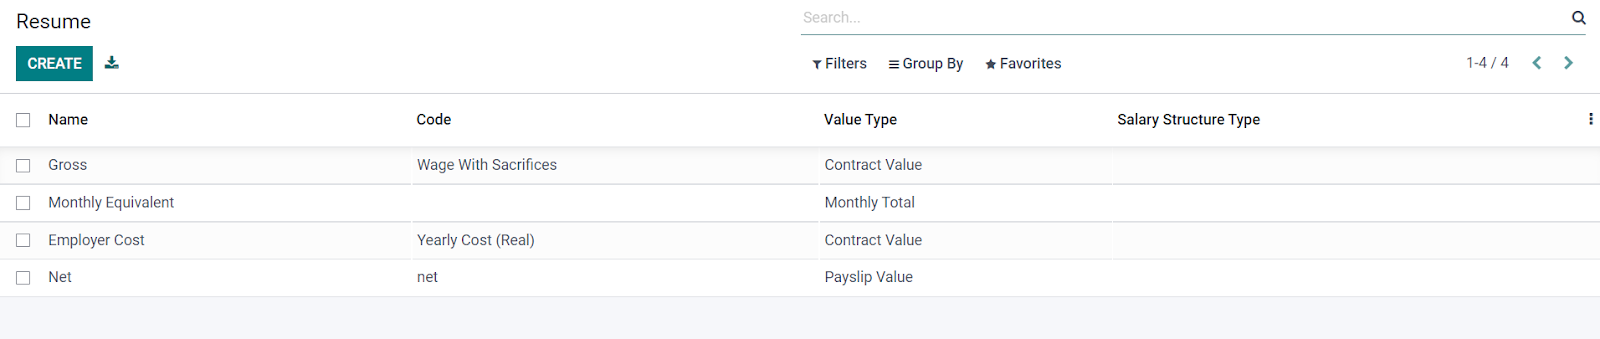
The preview of the list of Resume will show the Name, Code, Value Type, and Salary Structure Type of each Resume.

While creating a new one, specify details about the Title, Category, Salary Structure Type, Impacts Monthly Total, Advantage Unit of Measure, Value Type, and Fixed Value.
Attendance
In the Attendance module, Odoo 15 includes an amazing option to count extra hours worked by the employees. You can easily enable this feature from the Configuration menu of the module. Under the Extra Hours tab, you can find the Count Extra Hours option as shown in the image below. In the Start From field, you can mention the date to start counting the extra hours. Count of extra hours will be considered from this date and extra hours prior to this date will not be considered.
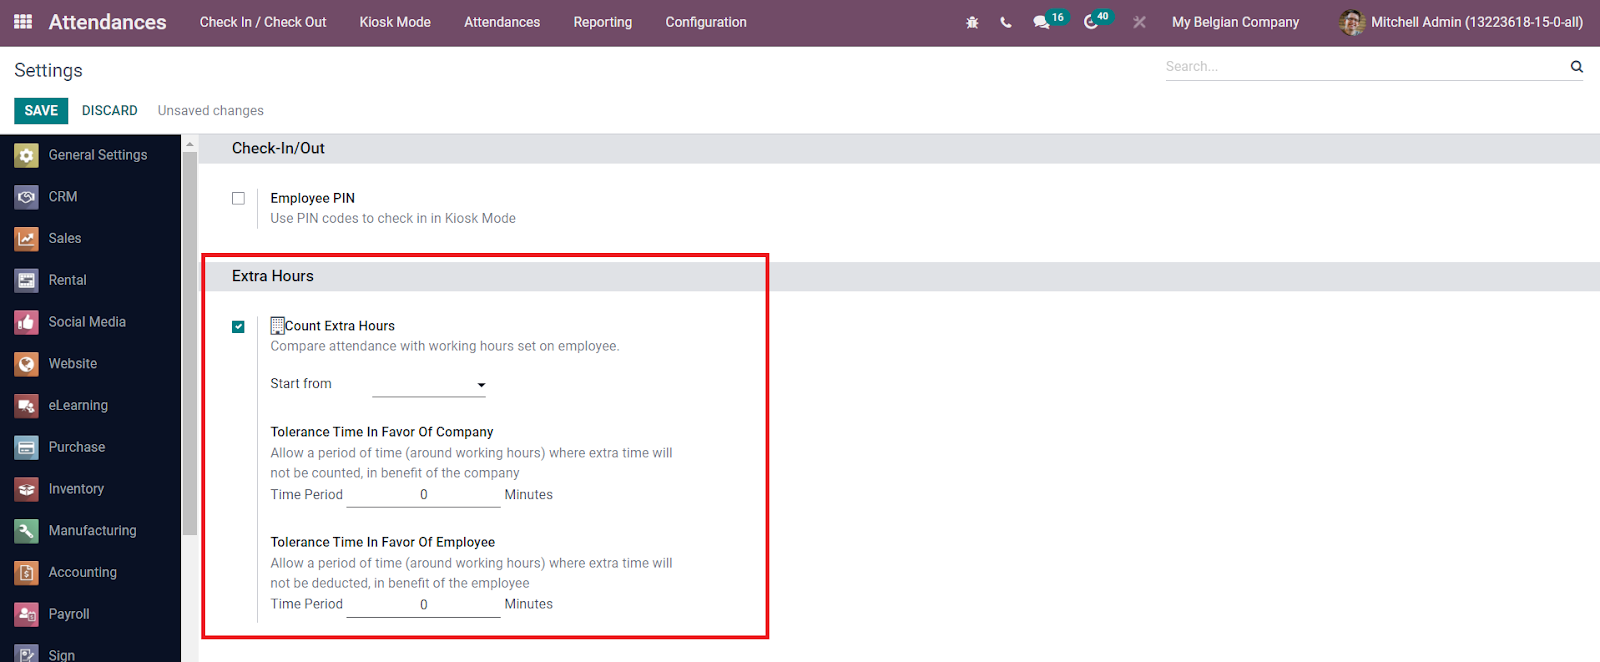
At the moment you activate this option, you will get two additional options to define which are Tolerance Time in Favour of Company and Tolerance Time in Favour of Employee. Using these fields, you can allow a period of time where extra time will not be counted in benefit of the company and a period of time where extra time will not be deducted in benefit of the employee respectively.

The extra hours worked by each employee can be analyzed from the Reporting menu available in the Attendance module. You can easily create reports about the extra hours worked by each employee on a daily, monthly, and yearly basis from this reporting platform.
While configuring different Time Off Types in the Odoo Time Off module, you will get a new field in the configuration window called ‘Deduct Extra Hours’ as marked in the screenshot below.

Once a time off of this type is approved, extra hours in attendance will be deducted.
Payroll
In the new Odoo 15 Payroll module, you can effortlessly filter the employees based on the status of their contracts. As you can see in the screenshot below, you will get various options under the Status tab in the panel available on the left side of the screen.
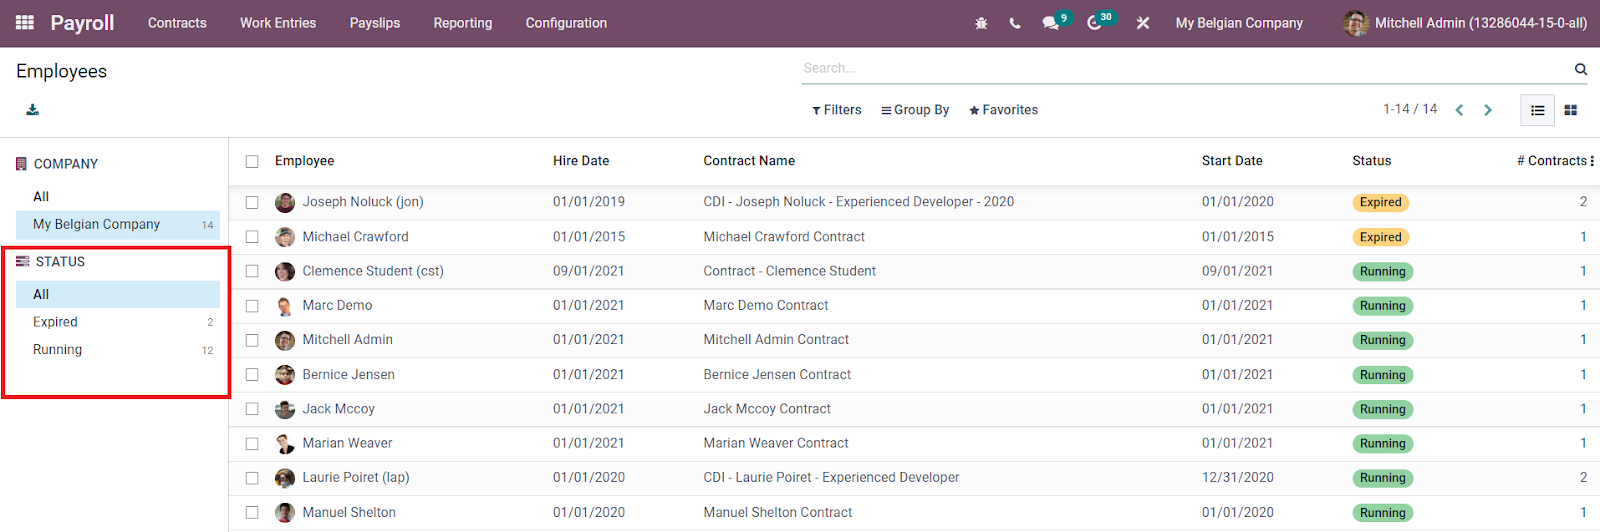
Using the options available under the Status tab, you can sort employees based on running contracts and expired contracts.
When you take a look at the Filters and Group By options available in the main dashboard of the Odoo 15 Payroll module, you can observe remarkable changes in the corresponding options. Several new filters and grouping options have been introduced in the latest version of Odoo.

In the Filters menu, the user will get advanced default filters such as Running Contracts, Contracts to Review, No Contracts, Part-Time, Currently Under Contract, and Active Employees. You are allowed to use the Add Custom Filters to create a new filter as per your requirements.

The Group By feature will help you to group the employees based on Job Position, Status, Reference Working Time, and Salary Structure Type. Using the Add Custom Group option, you can easily create new grouping options.
Just like the changes we observed in the sorting options available in the main dashboard of the Payroll module, you can find similar changes in the Favorite menu also.

As marked in the screenshot above, additional options can be seen under the Favorite menu such as Link Menu in Spreadsheet and Insert List in Spreadsheet. Using these options, it is possible to link the Employees menu shown in the screenshot into a spreadsheet and insert the list of employees into a spreadsheet respectively.
In Odoo 15, the user will get a new platform to manage the Salary Attachments under the Contracts menu. Already created salary attachments can be seen in a list view along with the details of Employee, Description, Type, Monthly Amount, Start Date, and Status.
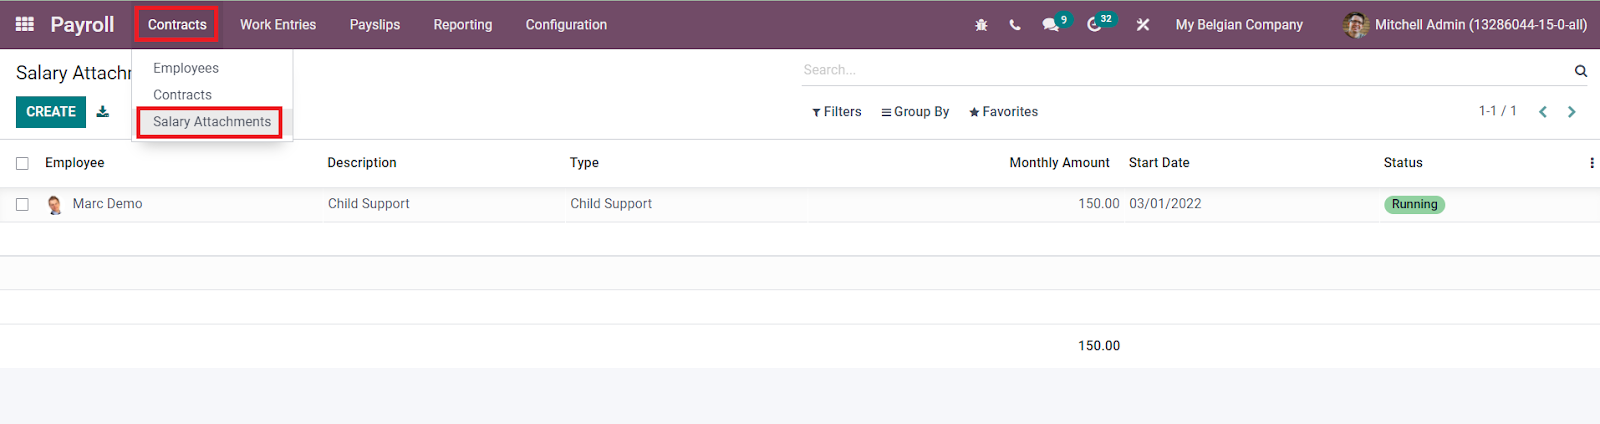
In order to create a new one, you are allowed to use the Create button given on the top left corner of the screen.

While creating a new Salary Attachment, you can mention the name of the Employee, the Description of the Salary Attachment, the Type, Start Date, the Document, the Monthly Amount (The amount to pay each month), and the Total Amount (total amount to be paid).
The user will get details about the wage of each employee from the Contracts menu available in the Odoo 15 Payroll module.

The Kanban view of the Contracts menu includes the wage of each employee in its preview as shown in the screenshot above. This is a new feature in Odoo 15.
Under the Work Entries menu, you will get a new submenu called Time Off to Report which will help you to monitor the time off of employees. While managing the payroll of employees, it is important to maintain a record of time off taken by each employee.

As you can see in the image above, the window will depict all types of time off which are waiting to be reported in payslips. The preview includes Employee, Mode, Time Off Type, Description, Start Date, End Date, Duration, Status, and Payslip State. Using the Status tab in the panel available on the left side of the screen, you can filter the time off based on Approved. More sorting options can be found under the Filters can Group By menus.
At the time of defining new Work Entry Types in Odoo 15, Odoo lets you select colors for the type to enhance the view.

Additionally, you will get DMFA Code and Unpaid in Structures Types fields to define in the new Work Entry Type configuration window. The DMFA Code will help you to identify the work entry in the DMFA report.
In the new Advantages creation window, you can find the Activity Type field in Odoo 15.
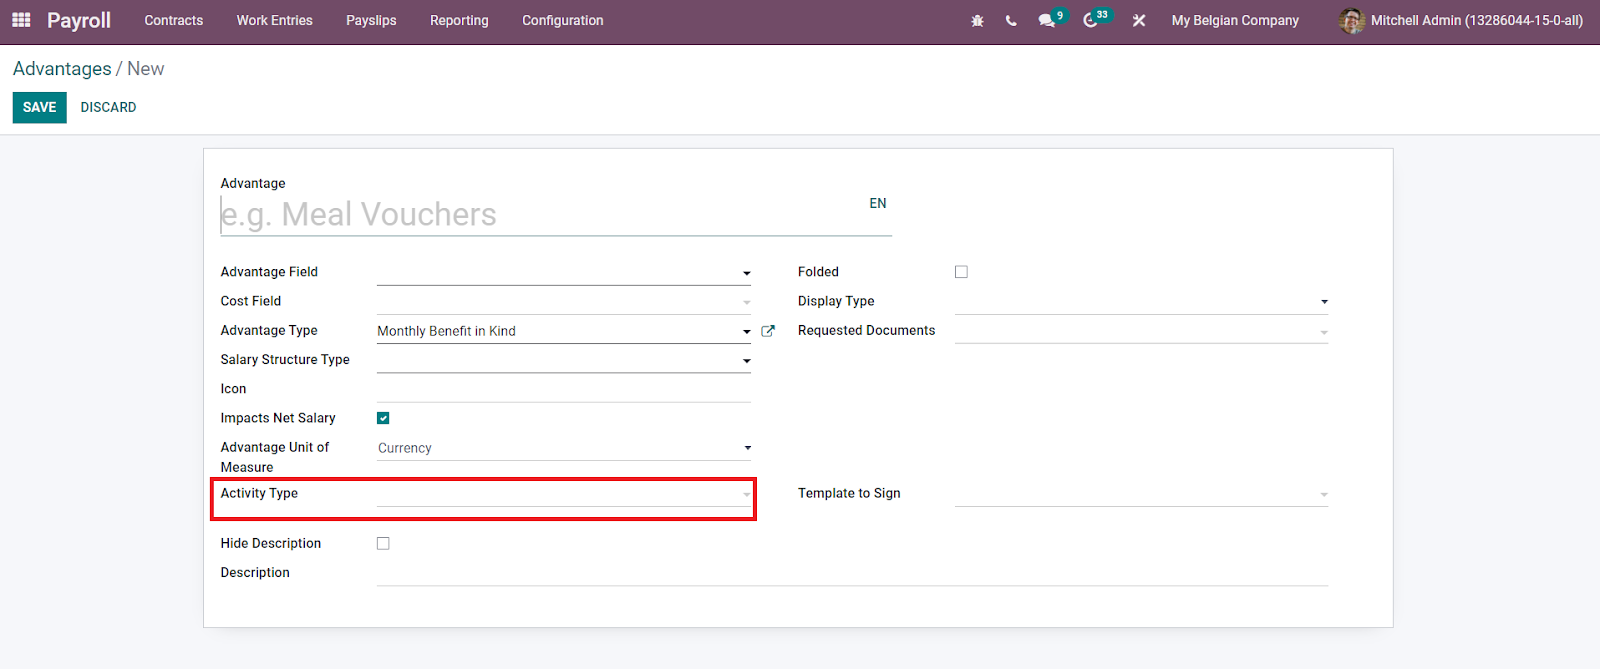
The type of activity you mention here will be automatically added to the contract of an employee, if the employee chooses this advantage.
Now, it is easier to schedule new activities with the employees regarding payslips from the Payslips platform itself.

The small clock icon given on the top right corner of the screen as marked in the image above will help you to manage and schedule new activities with employees. When you select the Activity views on this platform, Odoo will display all scheduled activities related to the payslips.

Using the Schedule Activity button, you can schedule a new activity easily. Select the required payslip from the given list and mention the required activity that you want to schedule with the employee in the corresponding fields.
The analysis of work entries can be effectively done with the help of the Work Entries Analysis platform available under the Reporting menu of the Payroll module. This is a new feature in Odoo 15 that allows you to examine the recorded work entries in the Payroll module.

As you can see in the image above, the window will be depicted with a tabular report that can be utilized to create advanced reports regarding work entries.
The reports regarding Salary Attachment can be generated by using the Salary Attachment Report option from the Report menu which is also a new reporting feature introduced in Odoo 15. The user will get a pivot view of the report as shown in the image below.

Using this platform, Odoo will assist you to analyze various types of Salary Attachments configured in the module with respect to the employees in your company. You are allowed to use the Measures, Filters, and Group By options to improve the analysis of the Salary Attachments.
The Settings menu of the Odoo 15 Payroll module includes a new option called Deferred Time Off.
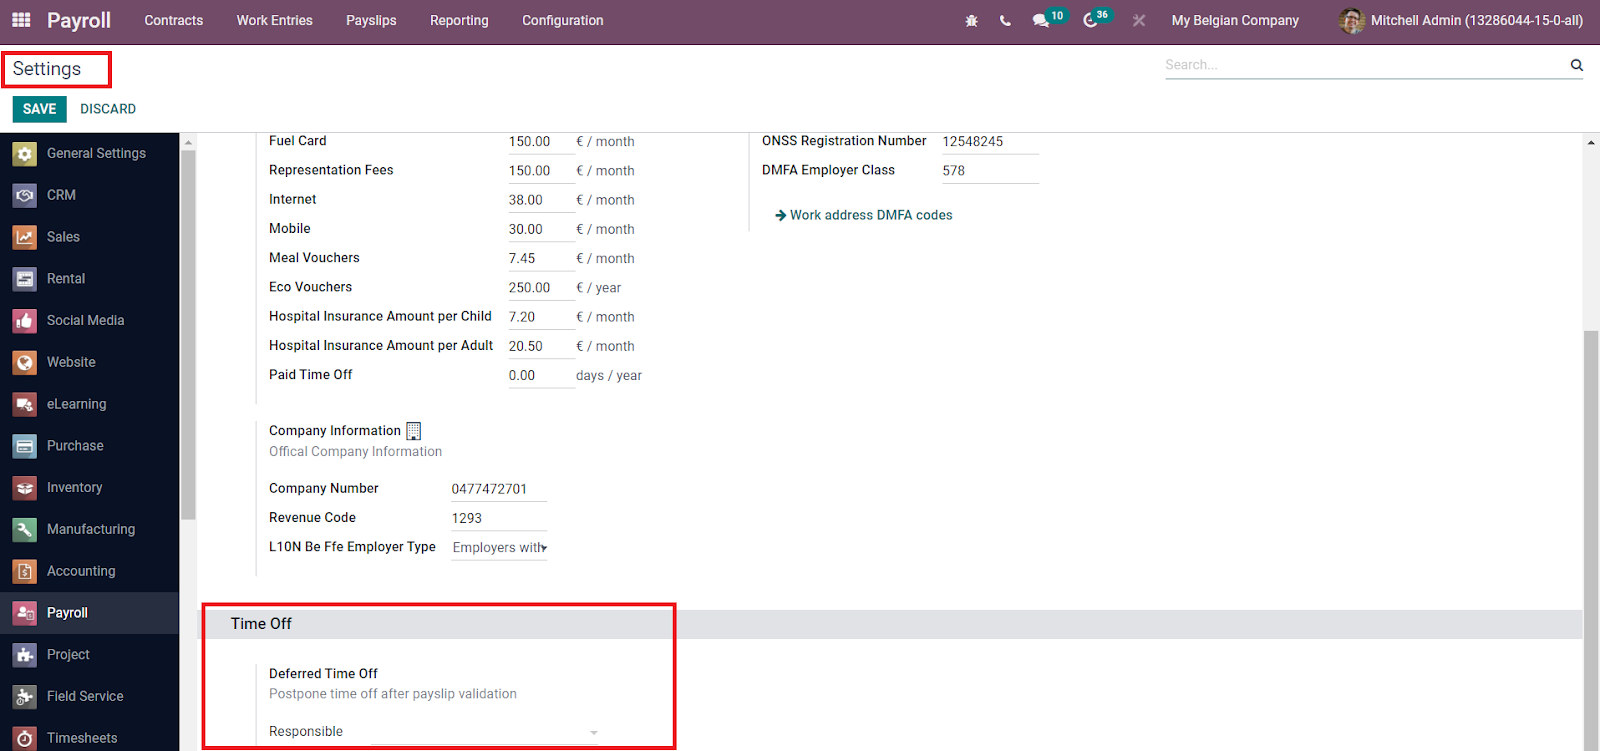
As you can see in the screenshot above, this feature will help you to postpone time off after the payslip validation.
Time Off
The main attractive feature of the Odoo 15 Time Off module is the new advanced dashboard. Users will get an enhanced dashboard as shown in the image below that will provide a distinct view of the Time Off recorded in the module on a daily, weekly, monthly, and yearly basis.

The Time Off Calendar will show different colors based on the Time Off Type. Based on the status of the Time Off, Odoo provides various patterns to display on the Time Off calendar so that the user will be able to understand the time off to approve, validated time off, and refused separately. The new dashboard in the Payroll module will be helpful to understand the status of each time off from the first view itself.
The Overview menu in the Payroll module will give an insight into All Time Off recorded in this module. As shown in the screenshot below, the Gantt view will display the name of each employee along with their time off.
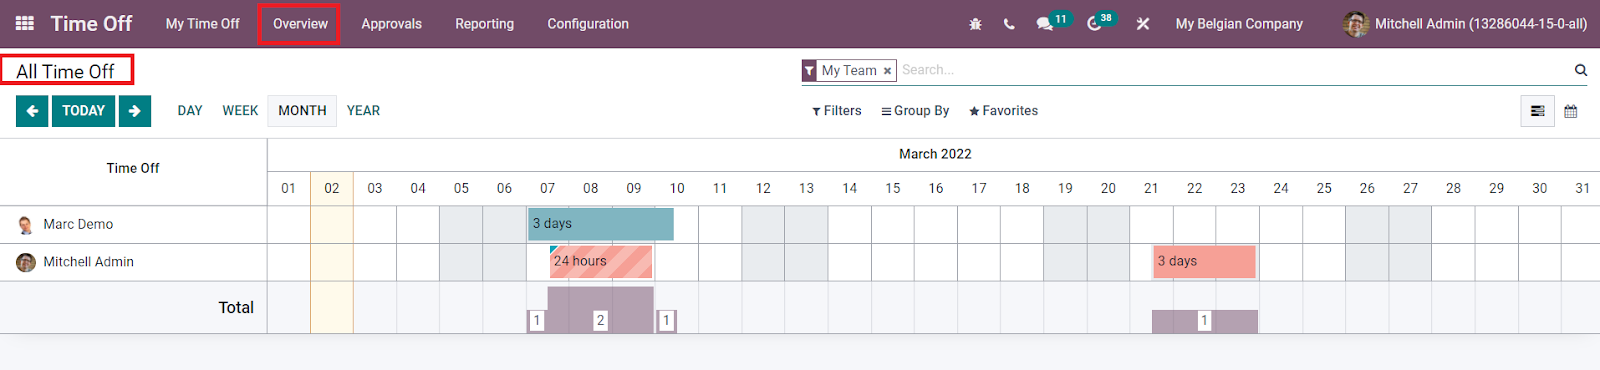
The number of total time off recorded in a day can be also observed on this platform.
While creating new Time Off Types in Odoo 15, you will get an additional field to activate Allow To Join Supporting Document. You can enable or disable this feature from the new Time Off Type creation window.
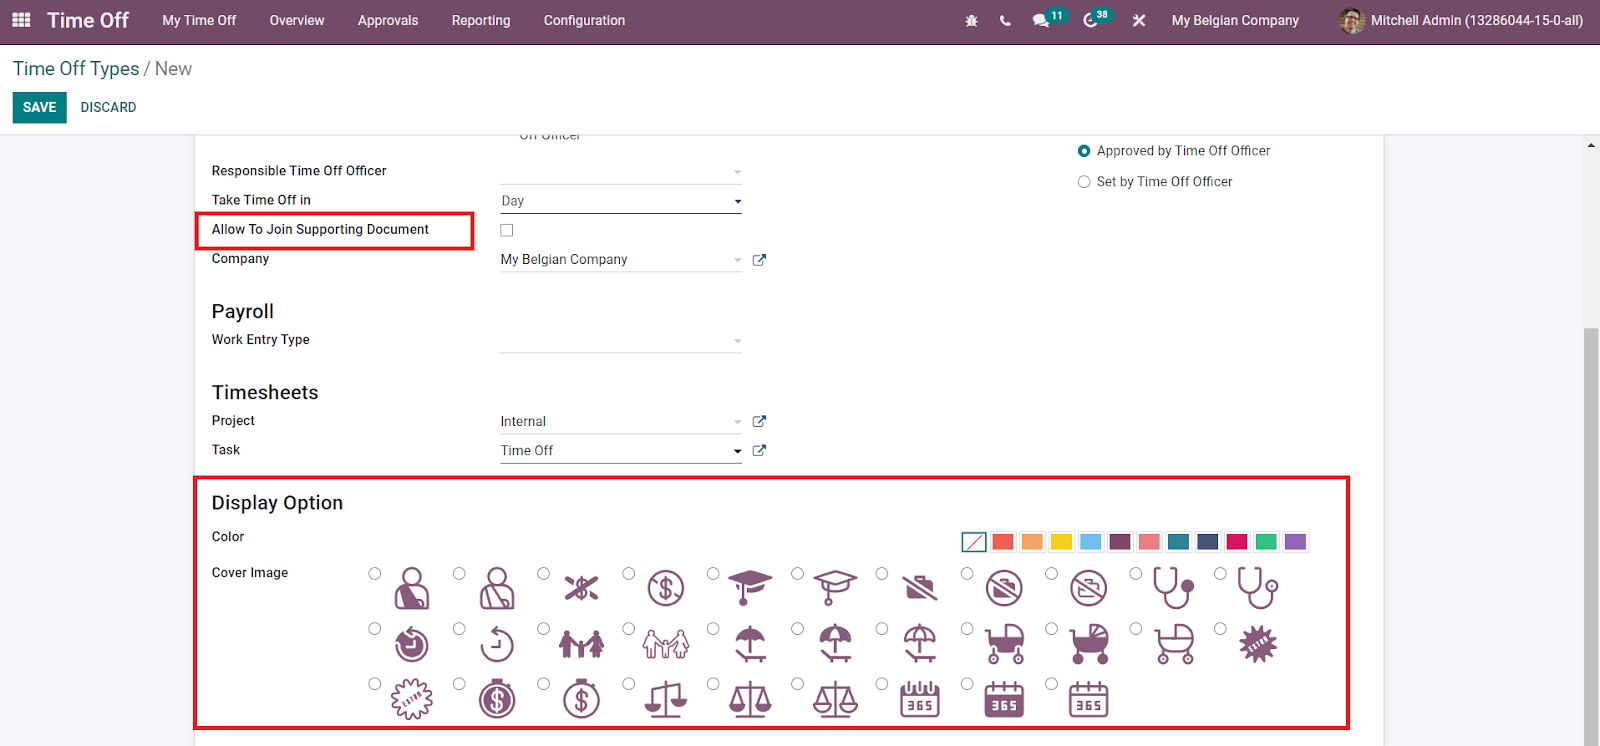
Additionally, you can use different icons for Time Off Types. These icons will help you to easily identify the Time Off Types. As marked in the image above, predefined Cover Images can be seen in the new Time Off Type creation window.
In Odoo 15, under the Configuration menu of the Time Off module, you will get a new platform where you can manage accrual plans for employees.

The Accrual Plans will help an employee to accrue paid time off each year and utilize it in future for sick leave or vacations. These plans are only available for qualified employees. The employees who are fit to the criteria mentioned in each accrual plan can use the opportunity to extend their paid time off. The list view of the Accrual Plans platform will show the Name, Levels, Time Off Type, and Employees. Clicking on the Create button will lead you to a new window where you can configure a new accrual plan for your employees.

Mention the Name, Level Transition, Time-Off Types, and Rules in the given fields.
The Public Holidays option under the Configuration menu in the Time Off module will provide an adequate platform to configure public holidays into your system. Creating a list of public holidays will make it easier to get a clear idea about the approved leaves in a company. The preview of the Public Holidays will be displayed along with the details of Name, Company, Start Date, End Date, Working Hours, and Working Entry Type as shown below.

You can effortlessly add a new holiday to the existing list simply by clicking on the Create button.
Appraisal
The Odoo 15 Appraisal module includes additional tabs in the new Appraisal creation window. When you create a new appraisal in this module, you will get the Appraisal, Skills, and Private Note tabs in the window as shown below.

In the latest version of Odoo, you can add the Skills of an employee into the Appraisal. The Skill tab will help the company to include the Skills, Skill Level, and Progress Justification of an employee which will give a clear idea about the talents of your employees. The Private Note tab can be found next to the Skills tab in the new Appraisal creation window. You can add private notes regarding the appraisal program in this tab.
In the Settings menu of the module, you can easily activate the Appraisals Plans for the employees. This option will help you to define the interval between each appraisal.

As you can see in the image above, you can specify the number of months between each appraisal and Odoo will automatically generate appraisals accordingly.
Another major change you can observe in the Odoo 15 Appraisals module is the improved Kanban view of the Goals dashboard.

Approvals
When you define new Approval Types in the Odoo 15, you will get the Employee’s Manager field that will help you to define how the employee’s manager interacts with this type of approval.

The corresponding field will show two options to select such as Employee’s Manager is Approver and Employee’s Manager is Required Approver. By selecting the first option, the employee’s manager will be in the approver list. The second option indicates that the employee’s manager will be required to approve the request.
When you observe the New Request creation window, you can find that a new field is added to the Approver’s tab.

As marked in the screenshot above, the Required field can be seen in the Approver’s tab which is also a new feature in Odoo 15.
Fleet
The user will get a smart button in the Vehicle form available in the Fleet module which will show the details about the employee.

Clicking on this smart button will lead you to the profile page of the respective employee.
While describing the Model details of the vehicle, you will get more options in the Fuel Type field.

As shown in the image above, new types can be found in this field which are not available in the earlier versions. Moreover, the structure of the Vehicle form is different from the older versions. You can find the details regarding Tax Info, Model, and Note in separate tabs in the new version of Odoo.
In the Odoo 15 Fleet module, a new button will be available in the Vehicle management window to change the current driver.
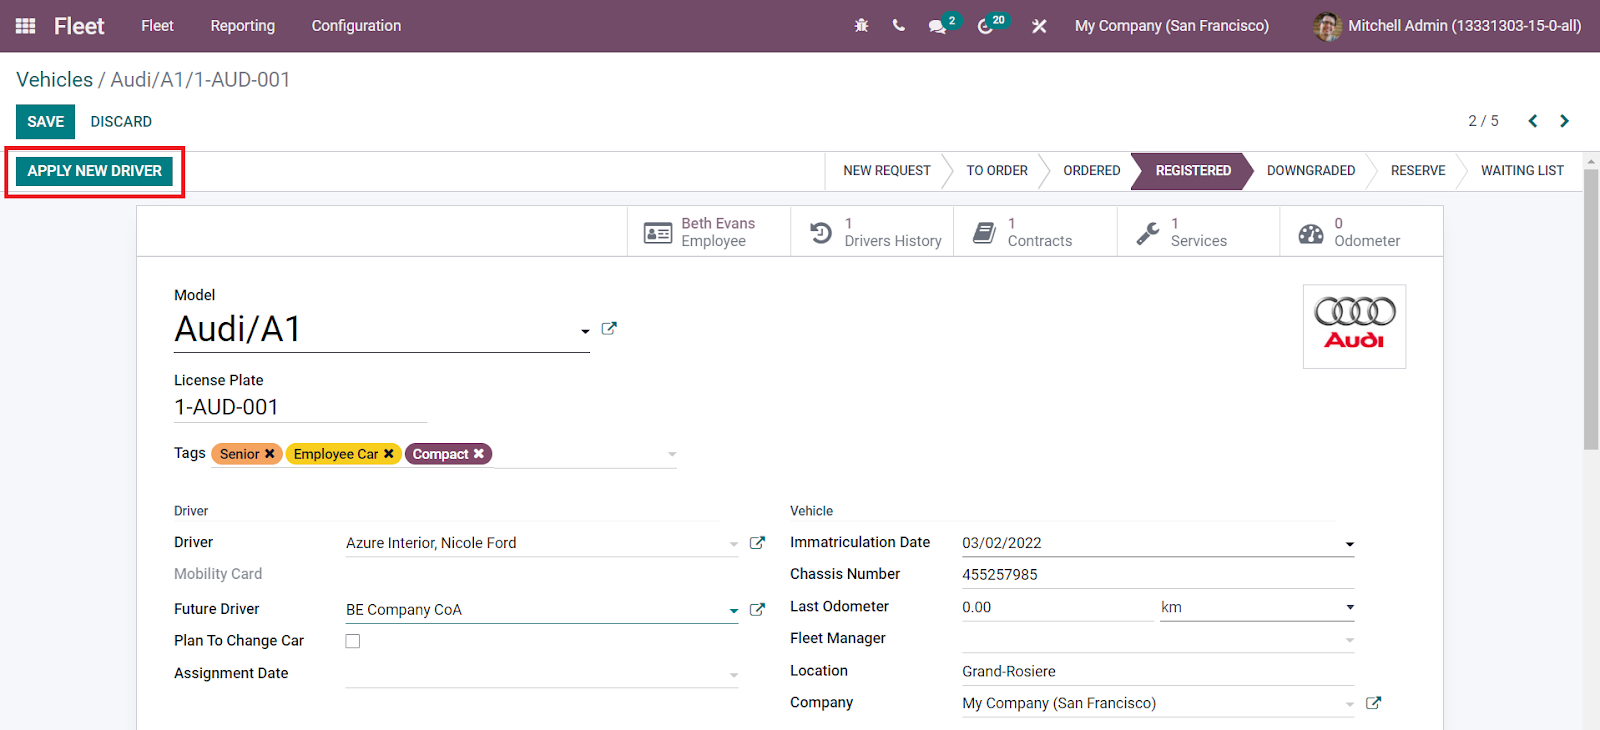
You can use the Apply New Driver button to change the driver and Odoo will automatically assign the duty to the employee mentioned in the Future Driver field.
The user will get a Pivot view of data in the Vehicles, Services, and Contracts platforms.

The Pivot view of the Vehicle platform can be used to analyze each vehicle based on its Count, Catalog Value, CO2 Emissions, Doors Number, Frame Size, Horsepower, Horsepower Taxation, Power, Purchase Value. Residual Value, and Seat Number.

In the Contracts window, you can examine the contracts based on Count, Cost, Depreciated Course Amount, and Recurring Cost using the Pivot view.
The Services can be analyzed according to its Count and Cost with the help of the Pivot view as shown below.

The main dashboard of the Fleet module includes advanced Filtering options to filter Cars and Bikes from the vehicles configured in this module.

Additionally, in the new version of Odoo, you will get a new platform under the Configuration menu called Model Category to define various categories to which the vehicle models belong.

You can easily configure a new Model Category by simply clicking on the Create button. In the same window, a new line will appear where you can mention the name of the category.
Using the new features in the Odoo 15 HR management modules, a company can perform HR operations in easier methods better than in earlier times. These features are helpful enough to depreciate the complexities in the easy management of human resources in an organization.
If you curious about what major changes Odoo has bring in Odoo 15 , you can check odoo 14 vs odoo 15 to know about the changes. You will be better able to comprehend the differences between Odoo 14 and Odoo 15.